Introduction
APIs have become so popular that almost all websites and applications rely on APIs to get data from server. Often user impersonation is used to authenticate as well as authorize access to the resource exposed by an API, but there are also use cases where application itself needs data from an API for functioning. Currently the most used authentication mechanism is OAuth, where identity management is performed by a third provider and both the client and resource server trusts this identity provider. While this works well, there is also another way to authenticate when the interaction is purely machine to machine, and works based on SSL certificates and is called Client Certificate Authentication.
What is?
Client certificate authentication is based on the same principle as the SSL certificates that a webserver uses to prove the authenticity to the browsers. In the client certificate scenario the client sends a SSL certificate to server to prove its authenticity. The client gets a SSL certificate signed by a trusted certifying authority (CA) and sends this certificate to the server in its request. The server verifies the certificate based on its list of trusted CAs and then performs further checks to validate the client to which the certificate was issued, to authenticate the caller. Since this method avoids exchange of tokens or secrets and certificates are encrypted using PKI and protected by passphrases this method is more secure compared to token based.
Implementation
To implement a development version of the setup we are going to use the below setup.
- Simple Azure Functions as the backend API.
- Gitbash to work with openssl to generate self signed certificates and keys for dev environment.
- Azure API Management to expose function app and perform the client certificate validation.
- Postman to send requests and verify responses.
Azure function app
Create a simple function app that accepts a name parameter and returns “Hello ”
using System.Net;
using Microsoft.AspNetCore.Mvc;
using Microsoft.Extensions.Primitives;

public static async Task<IActionResult> Run(HttpRequest req, ILogger log)
{
    string name = req.Query["name"];
    string responseMessage = string.IsNullOrEmpty(name)
        ? "Hello, World."
                : $"Hello, {name}.";

            return new OkObjectResult(responseMessage);
}
SSL Certificates
For production scenario, the client organization would get a SSL certificate that is signed by a trusted certifying authority. For the demo or development purpose, we can generate an SSL certificate on our computer using openssl utility. This utility comes pre-installed on linux distributions or it can be installed from openssl.org. On windows it is little tricky to install, but if you have gitbash installed, then it has openssl already configured, the below command can be executed on gitbash.
To generate self signed ssl certificate, run the below command on gitbash
openssl req -newkey rsa:2048 -nodes -keyout domain.key -x509 -days 365 -out domain.crt
The above command will ask for a passcode for the key and the organization details and generate the key and a certificate that is valid 365 days. The certificate is signed using the key (your key) hence it is called self signed certificate. For production environment, the api client should be creating a CSR (Certificate Sighing Request) and then get it signed by the certifying authority to get a valid certificate that is accepted by third party.
The certificate that is generated in the above step is pem format, to test with Azure API Management, it needs to be of pfx format. This conversion can be done using openssl as below. The command will request for passcode for the key which is the same passcode that was set in the above step. It will also ask for a export passcode, this passcode will be asked every time the certificate is imported, this is for added security to avoid certificate being used a malicious actor.
openssl pkcs12 -inkey domain.key -in domain.crt -export -out domain.pfx
Azure API Management
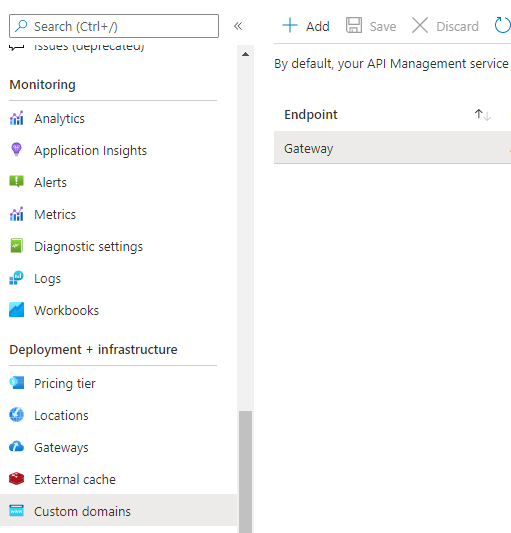
First step is to Create an API Management instance and enable to receive client certificates in the requests. This can be done by navigating to Deployment + infrastructure > Custom Domain and select the default gate and enabling Negotiate Client Certificates.

After this is done, add the function app to APIM and expose it as an API.
Now to add policy to validate certificates for authentication.
To verify if the certificate submitted by the client is a trusted CA signed certificate we can be use the method context.Request.Certificate.Verify(), also we can verify if the certificate is issued to the client app using context.Request.Certificate.SubjectName.Name != "expected-subject-name"
so to authenticate by validating the certificate signing authority and if the certificate is issues to the expected client application, we can use the below policy
<choose>
    <when condition="@(context.Request.Certificate == null || !context.Request.Certificate.Verify() || context.Request.Certificate.SubjectName.Name != "expected-subject-name")" >
        <return-response>
            <set-status code="403" reason="Invalid client certificate" />
        </return-response>
    </when>
</choose>
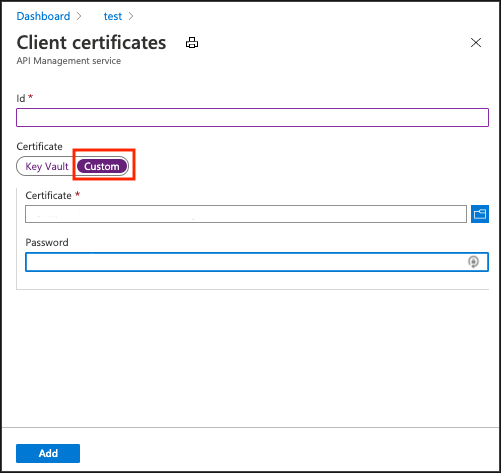
If there are multiple client applications accessing the API, instead of validating the subject name for each, there is an option to upload the client’s’ certificate to API Management directly or via a keyvault and validate incoming certificates against this list of trusted certificates. You can upload the certificates by navigating to Security > Certificates and (Certificates tab) add. The CA certificates tab in this screen is to upload the certificate chain of root and intermediate CA certificates in the event where the signing authority is not in the Azure trusted CA list.
 once we have the client certificates uploaded we can update the policy to validate is against the certificates from the uploaded trusted list of certificate
<choose>
    <when condition="@(context.Request.Certificate == null || !context.Request.Certificate.Verify()  || !context.Deployment.Certificates.Any(c => c.Value.SubjectName.Name == context.Request.Certificate.SubjectName.Name))" >
        <return-response>
            <set-status code="403" reason="Invalid client certificate" />
        </return-response>
    </when>
</choose>
or compare against certificate thumbprint
<choose>
    <when condition="@(context.Request.Certificate == null || !context.Request.Certificate.Verify()  || !context.Deployment.Certificates.Any(c => c.Value.Thumbprint == context.Request.Certificate.Thumbprint))" >
        <return-response>
            <set-status code="403" reason="Invalid client certificate" />
        </return-response>
    </when>
</choose>
Since the certificate that we are using for testing is a self signed certificate, the call to context.Request.Certificate.Verify() will fail due to missing trusted CA sign. So we remove this check for testing purpose only.
so the final policy looks like this
<choose>
    <when condition="@(context.Request.Certificate == null ||  !context.Deployment.Certificates.Any(c => c.Value.Thumbprint == context.Request.Certificate.Thumbprint))" >
        <return-response>
            <set-status code="403" reason="Invalid client certificate" />
        </return-response>
    </when>
</choose>
Testing
To test the API, we can create a dotnet client and add the certificate to the request and send to the APIM endpoint or to make testing quick, we can use postman to trigger the APIM endpoint.
If you try calling the APIM endpoint without a certificate, you get back a Http 403 error response, saying Invalid client certificate
So you need to add the certificate to postman, which will be sent as part of the request.
Navigate to Settings > Certificates tab and click on Add Certificate.
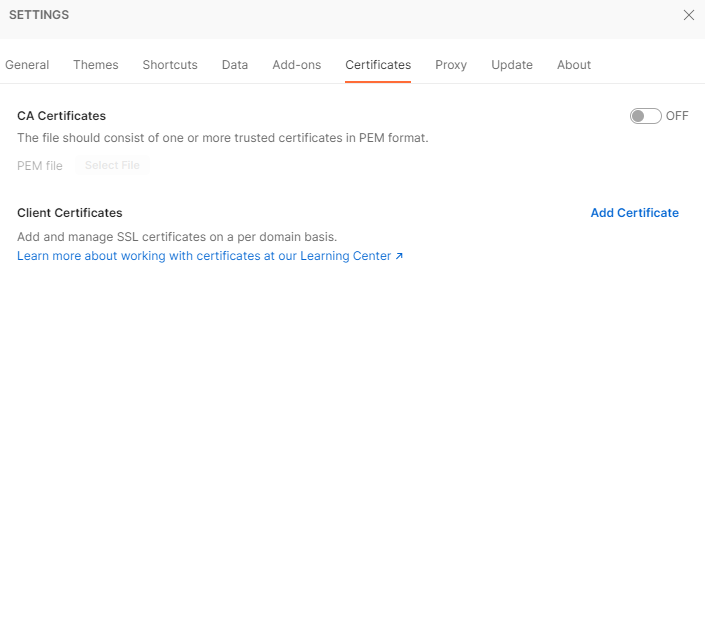
In the Host field, enter the domain of the request URL (APIM Host Name e.g. {APIMName}.azure-api.net) for which the certificate has to be sent. You can choose the pfx certificate file and the key file from the earlier setup. Also the passcode the one that was setup while creating the key file.
If you now try calling the APIM endpoint, you will receive the response message with a Http 200 code.
Conclusion
This is a quick, but secure way of establishing trust between two machines, without the need for extra http calls to generate or validate tokens. Also, when the certificate expires, the client needs ti just provide the server with the renewed certificate to upload to the store.